ShopDreamUp AI ArtDreamUp

Deviation Actions


Suggested Deviants


Suggested Collections


You Might Like…


Description
PART 3
if you missed them:
Part 1 (building a face)

Part 2 (defining features with color)

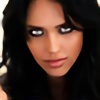
Okay so we have gotten us a face now, so lets make her a person…
1; So we have our face, eyes lined with a medium brown pencil and a few features defined out… pretty much exactly where we left at the end of part 2
2. Once more with the trusty “worn oil pastel” brush (Corel) I have decided to find some highlights, notably I highlighted her irises with Yellow and her lips with a soft pink
3.Still Oil Pastel, I have used a dark brown to define her eyebrows, find the crease of her upper eyelids and extend the shadow on her eye liner, and gave her some depth to the shadows below her nose. And with a deep rose color I found some shadows on her lips
4. This should be familiar by now, I am highlight the features in her “triangle zone” once more to give her face some more depth, (the great thing about color, you can layer it!) the idea is that the light areas come forward or catch the light and the dark areas recede, so this is where her face is going to start getting its features defined. Once again this is cheek bones, chin nose tip and nostrils then the bridge and finally the cleft of flesh just below the tip of her nose that catches light
5. Upper lip and “T-zone” (forehead, brow bones and nose bridge) as well as upper eye lids.
6. ROUGH BLEND, as you go if certain areas start to loose their definition you can always re-apply MORE highlight or shadow as needed (remember the blend sort of softens all the colors and flattens them out, if you need to adjust as your going don’t be afraid to!)
7. BLENDED
8. Lets give her some black eye liner now and make her pupils black (as opposed to the very dark blue) I used the PENCIL brush for this step. Also any little details that got lost in the blending you can find again
9. Lets give her some hair, I think she’s a red head! (Note that I like to use “S Curves” to form the lines of hair (to give movement) and much like her face, we apply several colors to give the hair depth, start dark in pastel brush, then lighter, then lightest, and then go over them again with the same three colors in PENCIL brush (which applies darker) this will give you plenty of details, highlights, and shadows. Remember that hair is darkest nearest the face and lightens the farther away it gets.
10. She’s still a bit flat, so with the BURN tool, I lightly found some new shadows for her.
I am sure I could’ve done a lot more with her, but this was a quick hour long project! YES that’s right it only took an hour (the tutorial/progressional part is why it took a more) What I wanted to do was show the rules of how I do a face from the front prospective, and how I blend the colors together. Its all a process. I hope everyone who wanted me to do this (or those of you who just happened to stumble upon it) will find it helpful and I look forward to seeing what you guys can come up with! Now go forth and try this little project on your own… and don’t forget to have fun, its an adventure, so don’t get frustrated if it doesn’t go well, or if you have to scrap it and start over (or if you are using traditional media, and you just have to PAINT OVER IT) it’s the journey that is the most rewarding, not necessarily the final destination that makes it worth while!
And now that you've seen how I get quickly from A to B without refrences and just anitomical rules, check out what I find very inspiring in this FAR SUPERIOR tutorial by a deviant I find inspiring;

if you missed them:
Part 1 (building a face)
Part 2 (defining features with color)
Okay so we have gotten us a face now, so lets make her a person…
1; So we have our face, eyes lined with a medium brown pencil and a few features defined out… pretty much exactly where we left at the end of part 2
2. Once more with the trusty “worn oil pastel” brush (Corel) I have decided to find some highlights, notably I highlighted her irises with Yellow and her lips with a soft pink
3.Still Oil Pastel, I have used a dark brown to define her eyebrows, find the crease of her upper eyelids and extend the shadow on her eye liner, and gave her some depth to the shadows below her nose. And with a deep rose color I found some shadows on her lips
4. This should be familiar by now, I am highlight the features in her “triangle zone” once more to give her face some more depth, (the great thing about color, you can layer it!) the idea is that the light areas come forward or catch the light and the dark areas recede, so this is where her face is going to start getting its features defined. Once again this is cheek bones, chin nose tip and nostrils then the bridge and finally the cleft of flesh just below the tip of her nose that catches light
5. Upper lip and “T-zone” (forehead, brow bones and nose bridge) as well as upper eye lids.
6. ROUGH BLEND, as you go if certain areas start to loose their definition you can always re-apply MORE highlight or shadow as needed (remember the blend sort of softens all the colors and flattens them out, if you need to adjust as your going don’t be afraid to!)
7. BLENDED
8. Lets give her some black eye liner now and make her pupils black (as opposed to the very dark blue) I used the PENCIL brush for this step. Also any little details that got lost in the blending you can find again
9. Lets give her some hair, I think she’s a red head! (Note that I like to use “S Curves” to form the lines of hair (to give movement) and much like her face, we apply several colors to give the hair depth, start dark in pastel brush, then lighter, then lightest, and then go over them again with the same three colors in PENCIL brush (which applies darker) this will give you plenty of details, highlights, and shadows. Remember that hair is darkest nearest the face and lightens the farther away it gets.
10. She’s still a bit flat, so with the BURN tool, I lightly found some new shadows for her.
I am sure I could’ve done a lot more with her, but this was a quick hour long project! YES that’s right it only took an hour (the tutorial/progressional part is why it took a more) What I wanted to do was show the rules of how I do a face from the front prospective, and how I blend the colors together. Its all a process. I hope everyone who wanted me to do this (or those of you who just happened to stumble upon it) will find it helpful and I look forward to seeing what you guys can come up with! Now go forth and try this little project on your own… and don’t forget to have fun, its an adventure, so don’t get frustrated if it doesn’t go well, or if you have to scrap it and start over (or if you are using traditional media, and you just have to PAINT OVER IT) it’s the journey that is the most rewarding, not necessarily the final destination that makes it worth while!
And now that you've seen how I get quickly from A to B without refrences and just anitomical rules, check out what I find very inspiring in this FAR SUPERIOR tutorial by a deviant I find inspiring;
Image size
2012x14385px 1.68 MB
© 2010 - 2024 EmpressIllyria
Comments6
Join the community to add your comment. Already a deviant? Log In
Niice